One major theme for our approach to rope is “tying well, not patterns” (the other being “tying well together”). Of course, we don’t mean that we shouldn’t learn any patterns. On the contrary, we find the concept of “forms” to be very helpful, and we view an established “pattern” as the end result of someone else’s problem-solving. (Form refers to the general position of the body once the rope is applied, and pattern refers to the specific way the rope is used to create and hold that position. See Introduction to Forms & Harnesses.) Therefore, we see patterns as an excellent way to study someone else’s thinking through rope.
However, regardless of whether you’re re-creating someone else’s pattern, developing your own, or improvising something in a free-form session, we believe that a genuine understanding of rope and the core principles of tying well will improve both the process and the result of that tying.
We also believe that “tying well” is the harder-to-see-but-more-important aspect of tying. It’s not all that hard to memorize a pattern or two and make that pattern look decent. It’s much harder to actually tie that pattern (or any pattern, or a non-pattern) well. And, similarly, it’s harder to tell if someone’s tied well than it is to compare what they tied against a mental image of the “correct” pattern in your head based on how the tie “looks” on a given body. So, we focus on “tying well” both as a way to improve tying and as a way to better assess the tying of potential partners (and, thereby, make your risk-taking more informed).
Below are some of the principles we emphasize for tying well. While these principles are focused primarily on tops, we believe bottoms should understand these principles as well and be able to recognize their competent execution.
First Principle: Tying Your Partner, Not the Rope
Tops: when you first start learning to tie, and any time you’re trying to learn something new, it’s normal for you to be more focused on what you’re doing and what the rope is doing than on what your partner is doing and experiencing. Attention tends to be more focused on the rope than on the person in the rope as you’re learning.
However, over time, the focus should shift from the rope itself to the person in the rope. In fact, this is one good indicator of your growth and experience: the ability to “not think about the rope” but instead to focus on the person. Reaching that level allows you to begin expressing your intent (see Intention & Balance) through your rope interactions.
For bottoms, it is often the reverse: it is natural for you to want to focus on and enjoy the experience itself. It can feel awkward (and boring) to instead focus on where the rope is going on your body, how even the tension feels, how you should or shouldn’t move during a tie, etc. It can be a bit of a buzz kill and not very fun. We suggest that you try to remember that you are also learning during that time, and furthermore, you are helping the top learn so that the two of you can both eventually enjoy focusing on the interaction and the intent instead of on the rope itself.
Lastly, while we offer advice on technique, safety, and other aspects, please remember that this advice is based on the best of our knowledge for most circumstances, but may need to be modified or ignored for a specific person (or a specific intention). The needs of the person in the rope should always take priority over anything else you might think you know.
A Word on “Modifications”
Related to the concept of “tying your partner, not the rope” is the idea that “you fit the rope to the body, not the body to the rope.” What we mean by this is that videos, books, and classes will always show you a version of a tie, but they can never show you all of the ways that tie may need to be altered or modified to accommodate the specific needs of the various bodies that will be in that tie. And some bodies won’t work at all with some ties. And all of that is OK and normal.
For example, some people can’t put their legs in a certain position, and so the agura tie has to be modified to account for that. On the other hand, some people have very sensitive nerves in their arms and no variation of a typical TK is ever going to be sustainable for them. Etc.
So, we don’t talk about “modifications” as a separate topic. Instead, we take the approach that “all rope is modification” (or should be.) Part of what we hope to convey are the starting principles behind various ties so that tops and bottoms can start to “think” in rope and make informed choices and decisions in rope.
Placement, Tension, Control
We see these concepts as the foundation of “tying well,” and the previous priorities are the result of, or are implicated in, these concepts. For example, placement can determine the degree of risk in a tie. Appropriate tension can make the difference between an aesthetically beautiful and intricate tie that maintains its beauty through movement and a tie that looks lopsided from the start and collapses over time. Similarly, the control of the rope can have a direct impact on the overall efficiency of the tie.
For each form (or general “family of patterns”) we examine, we discuss the implications of each of these concepts in detail, including “the how and the why” behind the choices.
We stress these concepts for bottoms, as well, by encouraging them to be mindful of the placement (including any specific concerns for their particular bodies), to test the tension in the tie (at appropriate times), and to notice the degree of control.
Another way to think of this is that the general concepts of “tying well” (placement, tension, control and structure) are the guiding principles. A subset of that are the specific forms themselves (arms-behind chest harnesses, for instance) and the particular concerns or implications that the form brings to bear on placement, tension, control, and structure. Finally, a subset of the general form is the specific pattern (Kanna Akechi’s TK, for instance) and the particular concerns or implications that are unique to that specific pattern.
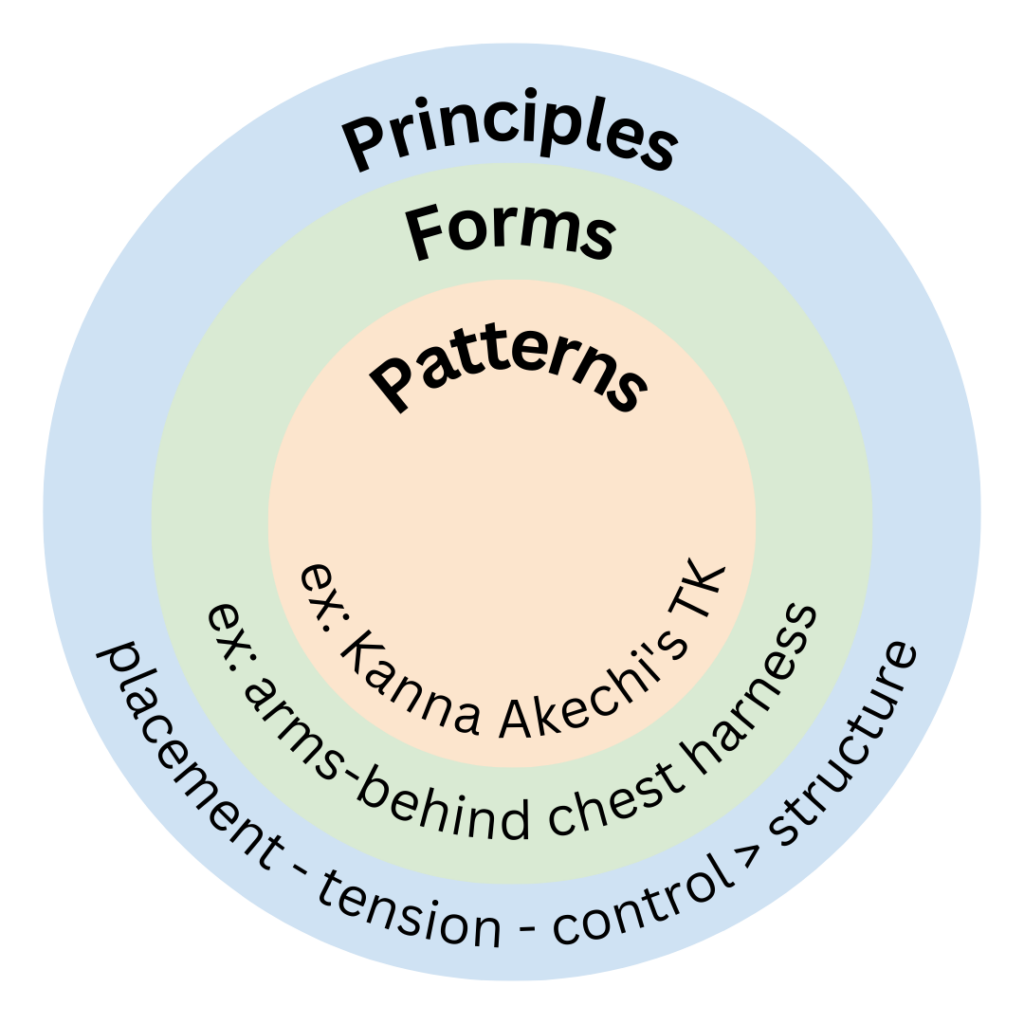
Below are some of the main points we examine in relation to each concept.
Placement
- In general, try to anchor the rope using the lines of the body and avoid placement that will encourage the rope to move. Remember that the body is not “boxy” and does not move in straight lines, so the path of your rope will often not be technically “straight” but will, instead, follow the natural lines of the body.
- Placement also includes the idea of “balance” within the tie. This is not “symmetry for the sake of aesthetics,” but instead, a concern for even distribution of tension and load. Poorly-balanced ties are harder to sustain because they don’t distribute tension and load evenly, and choices in placement are what determine whether or not a tie is balanced. (For example, a stem that should run along the center of the back but is, instead, off-set to one side will cause the body to feel more tension and pull on one side than the other.)
- Understand which bands constitute the “primary” bands for each family of patterns, the typical placement of those bands, and the reasons and related pros/cons of those choices.
- Understand the risk factors related to a given placement (which involves at least a minimal familiarity with body mechanics, circulation and nerves, and other common safety concerns).
- Know what your options are for alternate lines and construction, and the pros/cons of those variations.
Tension
- There are 2 main concerns with tension in general:
- Tension of the various lines of rope within a band. The goal is for all lines to be evenly tensioned against the body so that the band works and feels like one solid unit.
- The difference or similarity of tension between multiple separate bands within a tie. There is not “one ideal tension” for all bands or all ties. It is important to know whether and why each band in a tie should have the same amount of tension as others.
- Tension is applied to the body as the rope moves through the fingers and onto the skin, and is determined by the amount of force the fingers apply to the rope as it passes through them.
- Tension is not primarily about how “tight” the rope is, nor is it created by pulling harder on the rope after it’s on the skin.
- Different bands in a tie may require equal or different degrees of tension, depending on the tie and its purpose.
- The band with the most tension will take the load first and will take more of that load (depending on levels and attachment, see below).
Control
- Control involves both managing the person being tied and managing the rope and its movement around the body (often referred to as “rope handling”).
- Control of the rope includes controlling the tails/working end of the rope throughout the tie.
- Efficient rope control involves using specific finger and hand movements and pulls to construct solid frictions.
- Constructing solid, compact frictions is an essential goal of good control. If frictions are loose or unstable, any load applied to the tie will distort them, resulting in unplanned slack in the tie (loss of good tension) which can then allow for bands to move (undermining choices in placement).
Structure
Structure is the overall stability of the tie and the end result of good placement, tension, and control in the creation of the tie. If the placement and tension are off, the tie will distort or move. If the control of the rope is poor and the resulting frictions aren’t compact, loading the tie will force them to compact, and even if each friction only moves a fraction of an inch, that can add up to significant changes to the tie over multiple frictions.
However, structure also includes various methods of reinforcing the tie and/or compensating for the intended use of the tie. For example, a tie that consists of two primary bands that will have an up-line attached to the top band will require some method of securing the bottom band to the top band so that the tie isn’t pulled apart by the load from the up-line. For a second example, a tie that will be used to twist the upper body away from the direction of the lower body will likely need some method of preventing the tie from simply rotating and shifting on the body when the tie experiences that twisting pull from the up-lines.
Structure becomes more important when up-lines are attached to a tie (or the tie otherwise experiences force applied to it), so we pay closer attention to structure as students progress toward partial and full suspension.
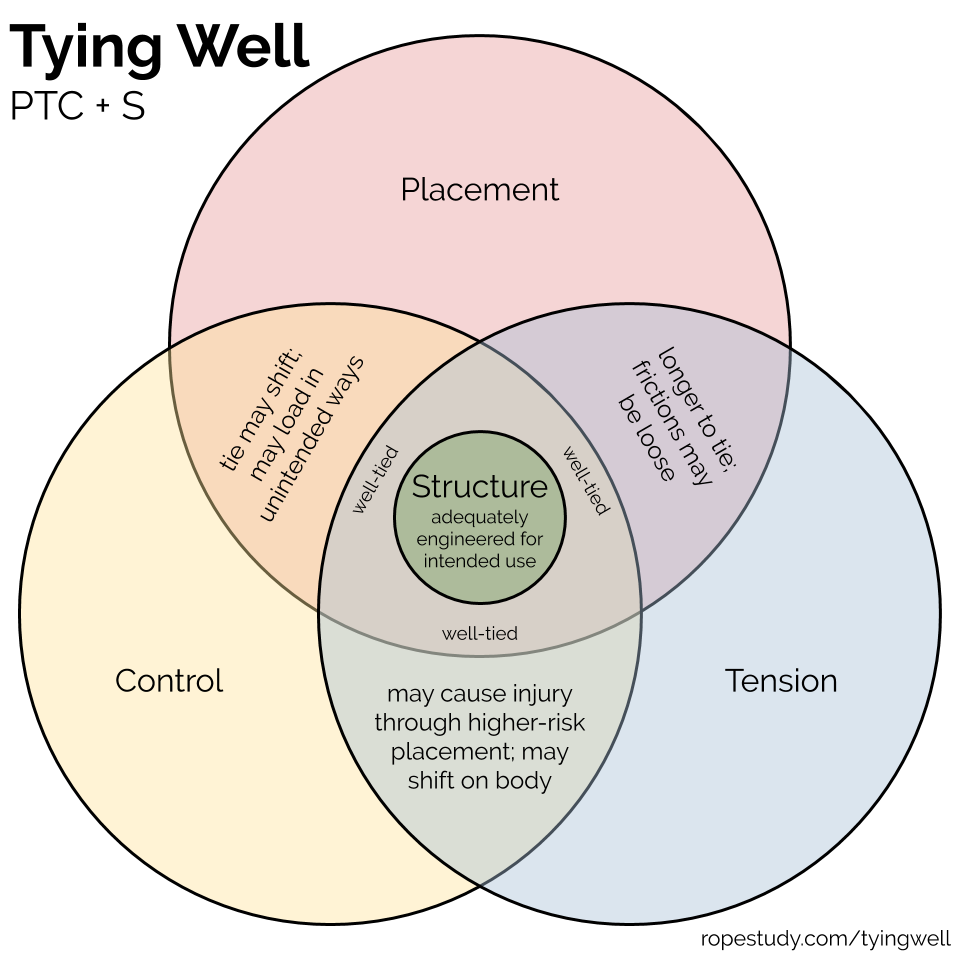
As this graphic illustrates, a structurally-solid tie relies on effective placement, tension, and control. However, structure is not the necessary result of effective placement, tension and control. I could create a tie that has good placement, tension, and control, but little structure — in other words, little that adequately reinforces the tie and makes it ready to withstand the pressure of some types of load or force on the tie.
So, while closely related, it’s also important to understand the difference between tying well (with good placement, tension, and control) and structure.
A Cheat Sheet for Rope Handling Techniques
- Laying Tape – Use the strength of your grip between your fingers to determine the amount of tension you put into the rope, to keep the bands flat and even, and to lay multiple wraps next to each other evenly. Apply the tension to the body as you move the rope, like laying tape across the skin.
- Bring the Rope to the Hand not the Hand to the Rope – When creating frictions, your hand or finger should be in place to create the friction, waiting for your other hand to bring the rope to it, not reaching out to grab the rope (and thereby often distorting the tie and the tension).
- Hand Off Behind – When switching hands (and often also when creating frictions), the hand that currently has the rope should move beyond the hand that’s going to take over the rope. This way, the hand taking over is picking up the tension behind the hand that was holding the tension and, therefore, the tension isn’t lost in the hand-off. (For frictions, the hand that’s holding the rope brings the rope to the friction/finger of the other hand and moves beyond the finger, so that any hooking of the rope is happening behind the hand that’s holding the tension.)
- Let the Rope Do the Work – Anytime you move around a turn in the body, or anytime the rope turns on itself in some way (a reverse tension, a friction, etc.), let the rope do the work of holding that tension in place. This means always directing your pull in the opposite direction of the tension when you bring the rope out of any turn or friction. (Think: that first reverse tension on the back.)
- Finger Hooks – Use your finger like a knitting needle, not a crochet hook. Your finger(s) goes in where you want the rope to come out. Just the tip – the more of your finger you put in, the more you have to get out. You bring the rope to the finger and hook the rope with your finger (typically bringing the rope behind the finger). You move your finger out and pull on that rope in whatever way will most immediately compact the friction.
- Finger Scissors – Use two fingers to pinch the rope and pull it through.
- Travel Through Tunnels – Always look for easier, more open places to pass the rope (so you can avoid trying to push rope or causing pinching and/or rope burns)
- Over the Rope, Under the Bands – This is the formula to remember for making a half hitch
- Extend the Arm – Keep your movements as smooth as possible. One way to do that is to let your finger hook continue into one continuous pull of the rope by simply extending your arm in whichever direction will pull the rope against the tension.
- Push the Stick – Control the tails of the rope so that, as you pull the rope through with one hand, the tails stay in a straight line with the rest of the rope as they move through the hole or friction you’ve created. This removes additional friction from the line, allowing you to pull the rope through more smoothly, more quickly, and in a controlled manner.
- Wring Out the Rope – If you extend your arm as far as possible in your pull and you still have rope that needs to be pulled through, grabbing the folded rope (as it comes out of the friction) and pulling on both will maintain the tension on the working end while continuing to pull through the rest of the standing end.
- Lead with the Tails – Particularly when you have a good amount of rope left, you want to control and move the tails in a way that anticipates where you’re going next. Otherwise, the tails will likely twist around your partner, get caught under a foot or knee, snag on a chair, etc. So, control and move them ahead of where you’ll be taking the rope next.